Preface
Goal: Preparing Vue Application, using Vue router.
Welcome to modern web framework. Oh.. I mean NPM bundle.
Managing Example Links
We are going to step into Vue component. Just like usual I use step by step explanation. This means four or five Vue components, from mockup, then simple, then enhanced. It is going to be tidy if we can put them all in one application. Each components managed by different links.
To manage all these links, we require router. This is where this article comes in place, before we step into the real components in the next article.
You can also consider this article as introducing to vue application.
Reading Reference:
Official Site
The Terminal Command
Install
As you might have seen in the example, you should install with NPM first.
❯ npm install -g @vue/cli
Create App
We should start with creating application
$ vue create vue-helloAnd you will have a chance, to get a preconfigured setup, as figure above.
Vue CLI v4.5.9
? Please pick a preset: (Use arrow keys)
❯ Default ([Vue 2] babel, eslint)
  Default (Vue 3 Preview) ([Vue 3] babel, eslint)
Manually select features 
Just continue until its done
🚀  Invoking generators...
📦  Installing additional dependencies...

...

⚓  Running completion hooks...

📄  Generating README.md...

🎉  Successfully created project vue-hello.
👉  Get started with the following commands:
Running for The First Time
You can safely enter the directory
$ cd vue-helloAnd run the npm script.
$ npm run serveAfter a few moment, there will a message in your terminal.
 DONE  Compiled successfully in 3433ms      3:35:08 PM


  App running at:
  - Local:   http://localhost:8080/
  - Network: http://192.168.1.152:8080/

  Note that the development build is not optimized.
  To create a production build, run npm run build.
Preview
Consider open your browser, to see result.
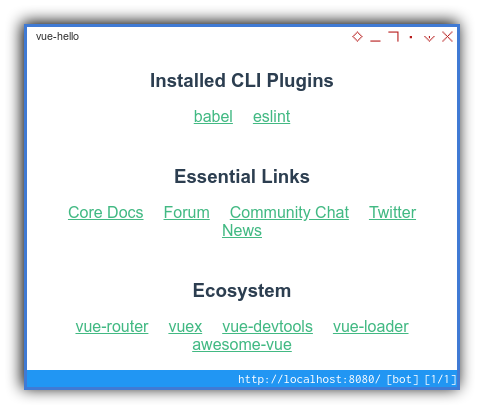
The typical default vue page can be shown as above figure.
The title in browser, follow the setting in package.json.
CLI Service
I once have difficulties with cli-service.
My workaround is, by also installing this locally, if required.
❯ npm i -s @vue/cli-service-global
+ @vue/cli-service-global@4.5.9
updated 1 package and audited 1380 packages in 29.084s
The Default Vue2 Hello
App.vue
You should find these structure in src/App.vue
<template>
  <div id="app">
    …
  </div>
</template>

<script>
...
</script>

<style>
...
</style>
You can learn about this structure somewhere else. There are tons of basic tutorial in the internet.
main.js
You may spot the src/main.js file as below.
import Vue from 'vue'
import App from './App.vue'

Vue.config.productionTip = false

new Vue({
  render: h => h(App),
}).$mount('#app')
What is this cryptic render: h => h(App) anyway 🤔?
It is actually short version of code below.
new Vue({
  el: '#app', // side effect with eslint
  render: function (createElement) {
    return createElement(App);
  }
})
You might also find old tutorial as below:
new Vue({
  el: '#app',
  components: { App },
  template: '<App/>'
})
This style has been deprecated,
and might confused people learning from ancient codes.
You should use render: h => h(App) instead.
HelloWorld.app
And at last, src/components/HelloWorld.vue
With basic Vue component structure.
<template>
  <div class="hello">
    …
  </div>
</template>

<script>
...
</script>

<style>
...
</style>
Using Vue2 Router
If you want to have muliple pages in single application.
You can utilize router to manage the application.
Reading Reference:
Official Site
Credits
As a beginner, I once confused about this router. But hey, the community is helpful. I got help from this kind guy.
Install
As usual, we need to install the dependency first, before we can us it.
$ npm i -s -D vue-router
+ vue-router@3.4.9
added 1 package from 1 contributor and audited 1305 packages in 29.198s
Directory Structure
Our directory structure should represent something similar as below:
$ tree -I node_modules
.
├── babel.config.js
├── package.json
├── package-lock.json
├── public
│   ├── favicon.ico
│   └── index.html
├── README.md
└── src
    ├── App.vue
    ├── assets
    │   └── logo.png
    ├── components
    │   └── HelloWorld.vue
    ├── main.js
    └── router
        └── index.js

5 directories, 11 files
We should create the router/index.js manually,
this will be explained later.
HelloWorld.vue
Consider we start from the component first. I make this very simple.
<template>
  <div>
    <p><strong>{{ msg }}</strong></p>
  </div>
</template>

<script>
export default {
  name: 'HelloEarth',
  props: {
    msg: { type: String, default: 'Hello Earth!' }
  }
}
</script>
index.js
After we are done with component, we can continue to configure our very first router.
src/router/index.js
import Vue from 'vue'
import Router from 'vue-router'
import HelloWorld from '@/components/HelloWorld'

Vue.use(Router)

export default new Router({
  routes: [
    {
      path: '/',
      name: 'default',
      component: HelloWorld,
      meta: { title: 'Hello' }
    }
  ]
})
main.js
And then add it into src/main.js file as below.
import Vue from 'vue'
import App from './App.vue'
import router from './router'

Vue.config.productionTip = false

new Vue({
  router,
  render: h => h(App),
}).$mount('#app')
We are not finished yet.
App.vue
At last, alter the landing page in src/App.vue.
<template>
  <div id="app">
    <router-link to="hello">Hello</router-link>
    <router-view></router-view>
  </div>
</template>

<script>
export default {
  name: 'App'
}
</script>

<style>
body { font-family: Arial, Helvetica, sans-serif; }
#app { margin: 1rem; }
a    { padding-right: 1rem; }
</style>
Preview
Consider open your browser, to see result.

The very simple page of vue router example,
can be shown as above figure.
Vue2 Multiple Component
We can leverage the basic example above with more component.
Directory Structure
$ tree src
src
├── App.vue
├── assets
├── components
│   ├── AlohaWorld.vue
│   ├── HelloWorld.vue
│   ├── TitleHeading.vue
│   └── YelloWorld.vue
├── main.js
└── router
    └── index.js

3 directories, 7 files
Note that we have a TitleHeading component in above tree.

Greeting Component
The HelloWorld is remain intact.
We have two more components:
<template>
  <div>
    <p><strong>{{ msg }}</strong></p>
  </div>
</template>

<script>
export default {
  name: 'AlohaMaui',
  props: {
    msg: { type: String, default: 'Aloha Maui!' }
  }
}
</script><template>
<div>
<p><strong>{{ msg }}</strong></p>
</div>
</template>
<script>
export default {
name: 'YelloWorld',
props: {
msg: { type: String, default: 'Yellow World!' }
}
}
</script>index.js
Now we can seriously make a real router:
import Vue from 'vue'
import Router from 'vue-router'
import HelloWorld from '@/components/HelloWorld'
import AlohaWorld from '@/components/AlohaWorld'
import YelloWorld from '@/components/YelloWorld'

Vue.use(Router)

export default new Router({
  routes: [
    {
      path: '/',
      name: 'default',
      component: YelloWorld,
      meta: { title: 'Yellow' }
    },
    {
      path: '/hello',
      name: 'Hello',
      component: HelloWorld,
      meta: { title: 'Hello' }
    },
    {
      path: '/aloha',
      name: 'Aloha',
      component: AlohaWorld,
      meta: { title: 'Aloha' }
    },
    {
      path: '/yellow',
      name: 'Yellow',
      component: YelloWorld,
      meta: { title: 'Yellow' }
    }
  ]
})
But what is this additional meta title anyway 🤔?
Heading Component
This TitleHeading is using this $route.meta.title variable.
<template>
  <section>
    <h1>{{ $route.meta.title }}</h1>
  </section>
</template>

<script>
export default {
  name: 'TitleHeading'
}
</script>
This way, we can set different title,
based on page setting in route configuration.
App.vue
We should gather all these components above in src/App.vue.
<template>
  <div id="app">
    <TitleHeading/>

    <router-link to="hello">Hello</router-link>
    <router-link to="aloha">Aloha</router-link>
    <router-link to="yellow">Yellow</router-link>

    <router-view></router-view>

    <p>I love myself as well.</p>
  </div>
</template>

<script>
import TitleHeading from './components/TitleHeading.vue'

export default {
  name: 'App',
  components: {
    TitleHeading
  }
}
</script>

<style>
body { font-family: Arial, Helvetica, sans-serif; }
#app { margin: 1rem; }
a    { padding-right: 1rem; color: #00796b; }
</style>
Consider also have a nice link color in stylesheet.
Finishing with main.js
We want the title to be also dynamically changed right?
Then append these additional code into src/main.js file as below.
import Vue from 'vue'
import App from './App.vue'
import router from './router'

Vue.config.productionTip = false

new Vue({
  router,
  render: h => h(App),
  computed: {
    pageTitle: function() {
      return this.$route.meta.title;
    }
  },
  created () {
    document.title = this.$route.meta.title;
  },
  watch: {
    $route(to) {
      document.title = to.meta.title;
    },
  }
}).$mount('#app')
Preview
Consider open your browser, to see result.

The multi component of vue router example in a single page,
can be shown as above figure.
Just click each link, and the content would be changed instantly.

Using Vue3 Router
Vue3 had released in late 2020.
You can also utilize Vue3.
It is very similar with Vue2.
Reading Reference:
Official Site
Install
As usual, we need to install the dependency first, before we can us it.
$ npm i -s -D vue-router@next
+ vue-router@4.0.0-rc.6
updated 1 package and audited 1327 packages in 30.097s
Reusable Component
We don’t need three component to do the same task.
We can utilize this single HelloWorld.vue component only,
and throw away the other two components.
you wasted me up, and dumped me from the mountain you wasted me up, and throw me from to the sea
Directory Structure
$ tree src
src
├── App.vue
├── assets
├── components
│   ├── HelloWorld.vue
│   └── TitleHeading.vue
├── main.js
└── router
    └── index.js

3 directories, 5 files
App.vue
We should gather all these components above in src/App.vue.
It is exactly the same as the previous Vue2 version.
main.js
The main.js has a new syntax, as shown below:
import { createApp, reactive } from 'vue'
import App from './App.vue'
import router from './router'

const Title = reactive({
  computed: {
    pageTitle: function() {
      return this.$route.meta.title;
    }
  },
  created () {
    document.title = this.$route.meta.title;
  },
  watch: {
    $route(to) {
      document.title = to.meta.title;
    },
  }
})

createApp(App)
  .use(router)
  .mixin(Title)
  .mount('#app')
In Vue3 we have chain functions: use, mixin, and mount.
Heading Component
The TitleHeading is remain intact.
It is exactly the same as previous Vue2 code.
HelloWorld.vue
Is there any changes here?
<template>
  <p><strong>{{ msg }}</strong></p>
</template>

<script>
export default {
  name: 'HelloEarth',
  props: {
    msg: { type: String, default: 'Hello Earth!' }
  }
}
</script>
Yes, the previous Vue2 version has more div:
<template>
  <div>
    <p><strong>{{ msg }}</strong></p>
  </div>
</template>
index.js
Finnaly the router itself.
We can adapt the previous code to Vue3 writing style.
import { createWebHistory, createRouter } from "vue-router";
import HelloWorld from '@/components/HelloWorld'

const routes = [
  {
    path: '/',
    name: 'default',
    component: HelloWorld,
    meta: { title: 'Yellow' },
    props: { msg: 'How Are You?' }
  },
  {
    path: '/hello',
    name: 'Hello',
    component: HelloWorld,
    meta: { title: 'Hello' },
    props: { msg: 'Hello Earth!' }
  },
  {
    path: '/aloha',
    name: 'Aloha',
    component: HelloWorld,
    meta: { title: 'Aloha' },
    props: { msg: 'Aloha Maui!' }
  },
  {
    path: '/yellow',
    name: 'Yellow',
    component: HelloWorld,
    meta: { title: 'Yellow' },
    props: { msg: 'Yellow World!' }
  }
];

const router = createRouter({
  history: createWebHistory(),
  routes,
});

export default router;
As you can see in above routes,
they all use the same HelloWorld component.
Simpler right?
Preview
It is exactly the same as previous.
Vue Mixin
This is a Vue2 feature that I can use in Vue3.
In the next article I require three components,
all with the same template structure, but different behaviour.
How am I going to achieve this in Vue?
mixin comes to rescue We can go further from previous example.
TemplateAbstract.vue
First we have to move the template to other components.
<template>
  <p><strong>{{ msg }}</strong></p>
</template>
This component contain the structure, only <template>.
The real world template structure,
might be longer, with a few line of tags.
HelloWorld.vue
Then use it somewhere, with mixin.
<script>
import TemplateAbstract from '@/components/TemplateAbstract'

export default {
  mixins:[TemplateAbstract],
  name: 'HelloEarth',
  props: {
    msg: { type: String, default: 'Hello Earth!' }
  }
}
</script>
This component contain behaviour only, in <script>.
The real world script behaviour,
may vary between different components.
Preview
It is exactly the same as previous. There is no need for more figure here.
And we are done.
What’s Next?
It is a good time to go back to our very tabs component.
But this time we will represent in Vue CLI fashioned.
Consider continue reading [ Tabs - JS - Vue2 Application ].